


课程
773 字
约 3 分钟
大三下
2.2 区域四连通种子填充算法
计算机图形学labs/lab02-polygon-filling·更新于 2026-09-15
2.2 区域四连通种子填充算法
1. 任务描述
根据下面要求,在右侧修改代码空间,绘制出预期输出的图片。平台会对你编写的代码进行测试。
本关任务
- 理解简单的种子填充算法的原理。
- 利用 VC + OpenGL 实现基本的多边形填充算法。
- 调试、编译、修改程序。
运行前

输出

具体要求
利用多边形的区域四连通种子填充算法对 BoundaryFill4() 函数进行补全,最终实现多边形填充后的图片。
相关知识
为了完成本关任务,你需要掌握:区域四连通种子填充算法。
1. 种子填充算法原理
区域四连通种子填充算法边界表示,就是指规定边界颜色,若当前像素点颜色是边界颜色,那么我们认为到达图形边界,对该像素点我们不进行绘制,并且也不会从这个点出发进行像素点的扩展;反之,若当前像素点颜色不是边界颜色,那么无论它是什么颜色的,我们都认为这是属于待填充图形的内点,需要进行绘制并且向外扩展。
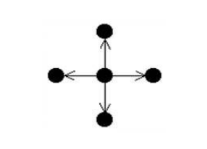
假设当前判断像素点 (200, 150) 应该绘制,那么我们在绘制这个点的颜色后,应当判断这个点四周的点是否也应当进行绘制。四连通方式就是对这个点的左、上、右、下四个像素点逐一进行类似操作(是否绘制以及扩展操作),进而递归式地扩展到整个区域。
开始你的任务吧,祝你成功!
2. 我的回答
文件 step3/test3.cpp:
// 评测代码所用头文件-开始
#include <opencv2/core/core.hpp>
#include <opencv2/highgui/highgui.hpp>
#include <opencv2/imgproc/imgproc.hpp>
// 评测代码所用头文件-结束

// 提示:写完代码请保存之后再进行评测
#include <GL/freeglut.h>
#include <math.h>
#include <string>
#include <iostream>
using namespace std;

const int POINTNUM = 5;

struct Point {
    int x;
    int y;
    Point() {}
    Point(int x, int y) {
        this->x = x;
        this->y = y;
    }
} polypoint[POINTNUM];

int MaxY, MinY;//多边形顶点沿Y轴的最小值 and 最大值

int vis[400][400];//判断该坐标的点是否为填充色,0为背景色,1为填充色

void Init() {
    polypoint[0] = Point(100, 100);
    polypoint[1] = Point(100, 300);
    polypoint[2] = Point(200, 200);
    polypoint[3] = Point(300, 300);
    polypoint[4] = Point(300, 100);
}

void BoundaryFill4(int x, int y) {
    // 请在此添加你的代码
   /********** Begin ********/
    if (vis[x][y] == 0) {
        vis[x][y] = 1;
        glVertex2f(x, y);
        BoundaryFill4(x + 1, y);
        BoundaryFill4(x - 1, y);
        BoundaryFill4(x, y + 1);
        BoundaryFill4(x, y - 1);
    }
   /********** End **********/
}

void BoundaryPoly() {
    int i, t, k, x, y;
    for (i = 0; i < POINTNUM; i++) {
        i == 0 ? t = POINTNUM - 1 : t = i - 1;
        if (polypoint[i].y >= polypoint[t].y) {
            MinY = polypoint[t].y;
            MaxY = polypoint[i].y;
            x = polypoint[t].x;
            if (polypoint[t].x == polypoint[i].x) {
                k = 0;
            }
            else
                k = (float)(polypoint[i].y - polypoint[t].y) / (float)(polypoint[i].x - polypoint[t].x);
        }
        else
            {
            MinY = polypoint[i].y;
            MaxY = polypoint[t].y;
            x = polypoint[i].x;
            if (polypoint[t].x == polypoint[i].x) {
                k = 0;
            }
            else
                k = (float)(polypoint[t].y - polypoint[i].y) / (float)(polypoint[t].x - polypoint[i].x);
        }
        for (y = MinY; y < MaxY; y++) {
            glVertex2f(x, y);
            vis[x][y] = 1;
            x += k;
        }
        if (polypoint[t].y == polypoint[i].y && polypoint[i].x > polypoint[t].x) {
            for (x = polypoint[t].x; x < polypoint[i].x; x++) {
                glVertex2f(x, polypoint[t].y);
                vis[x][y] = 1;
            }
        }
        else if (polypoint[t].y == polypoint[i].y && polypoint[i].x < polypoint[t].x) {
            for (x = polypoint[i].x; x < polypoint[t].x; x++) {
                glVertex2f(x, polypoint[t].y);
                vis[x][y] = 1;
            }
        }
    }
}

void MyDisplay()
{
    glClear(GL_COLOR_BUFFER_BIT);
    glColor3f(1.0f, 1.0f, 1.0f);
    glBegin(GL_POINTS);
    glColor3f(0.0, 1.0, 0.0);//设置颜色的函数
    //将边界用像素表示并输出;
    BoundaryPoly();
    BoundaryFill4(200, 150);
    glEnd();
    glFlush();
}

void MyReshape(int w, int h)
{
    glViewport(0, 0, (GLsizei)w, (GLsizei)h);
    glMatrixMode(GL_PROJECTION);
    glLoadIdentity();
    gluOrtho2D(0.0, (GLdouble)w, 0.0, (GLdouble)h);
}

int main(int argc, char* argv[])
{
    glutInit(&argc, argv);//窗口的初始化
    glutInitDisplayMode(GLUT_SINGLE | GLUT_RGB);//窗口模式的设定
    glutInitWindowPosition(100, 100);//窗口位置的设定
    glutInitWindowSize(400, 400);//窗口大小的设定
    glutCreateWindow("多边形的扫描填充");

    Init();
    glutDisplayFunc(MyDisplay);//调用函数
    glutReshapeFunc(MyReshape);
    glutMainLoopEvent();

    /*************以下为评测代码,与本次实验内容无关,请勿修改**************/
	GLubyte* pPixelData = (GLubyte*)malloc(400 * 400 * 3);//分配内存
    GLint viewport[4] = {0};
    glReadBuffer(GL_FRONT);
    glPixelStorei(GL_UNPACK_ALIGNMENT, 4);
    glGetIntegerv(GL_VIEWPORT, viewport);
    glReadPixels(viewport[0], viewport[1], viewport[2], viewport[3], GL_RGB, GL_UNSIGNED_BYTE, pPixelData);

	cv::Mat img;
    std::vector<cv::Mat> imgPlanes;
    img.create(400, 400, CV_8UC3);
    cv::split(img, imgPlanes);

    for(int i = 0; i < 400; i ++) {
        unsigned char* plane0Ptr = imgPlanes[0].ptr<unsigned char>(i);
        unsigned char* plane1Ptr = imgPlanes[1].ptr<unsigned char>(i);
        unsigned char* plane2Ptr = imgPlanes[2].ptr<unsigned char>(i);
        for(int j = 0; j < 400; j ++) {
            int k = 3 * (i * 400 + j);
            plane2Ptr[j] = pPixelData[k];
            plane1Ptr[j] = pPixelData[k+1];
            plane0Ptr[j] = pPixelData[k+2];
        }
    }
    cv::merge(imgPlanes, img);
    cv::flip(img, img ,0);
    cv::namedWindow("openglGrab");
    cv::imshow("openglGrab", img);
    cv::imwrite("../img_step3/test.jpg", img);
	return 0;
}这只是一个公告
站点域名henu.hodaru.com
Fireflyv6.16.7
Astrov7.2.10
Nodev22.23.2
pnpmv11.22.0
构建时间2026年9月15日 14:41:24
系统信息Linux / x86_64